Warning
Consider this Post outdated the second I released it. The single source of truth for your should be and is https://valetudo.cloud/pages/installation/dreame.html#fastboot and all credits must go to the valetudo team. I’m only writing this post as a reminder of the steps I took.
Important Resources
Starting with information gathering is obviously the first step. So here’s a list of useful pages I found to solve the quest of removing the cloud connection.
- Valetudo Cloud Homepage
- Valetudo Project Git Repo
- Valetudo Flash/rooting Tool
- Sunxi CodeBase
- Vacuum-robot Adverse Event Reporting System (VAERS)
- https://dontvacuum.me/
- https://robotinfo.dev/detail_dreame.vacuum.r2228o_0.html
- Slides from DEFCON 31 - Page 42 for Debug Pinout
- Firmware Builder for L10S Ultra
- linux-sunxi for Fedora
- FAQs
- Firmware Builder
- Add Check-Value for FW Builder
- Dreame Root PW calculator
Prepare the Software
As I’m running Fedora and not Debian, I need to adapt the steps from https://github.com/Hypfer/valetudo-sunxi-livesuit.
But luckily ist just a fork of Linux Sunxi and all missing details can be found here: https://linux-sunxi.org/LiveSuit#Fedora
We can skip the part where we have to compile libpng in v1.2 as fedora still ships it.
Install Fedora Packages
dnf install autogen automake libtool flex bison fastboot m4 dkms libusbx nas-libs kernel-devel libpng12
Compile and install the kernel module
This is a “backup” from linux-sunxi:
Now descend into the awusb directory and run
make
Now, as root, install the module in your module tree, and load it:
cp awusb.ko /lib/modules/`uname -r`/extra/
depmod -a
modprobe awusb
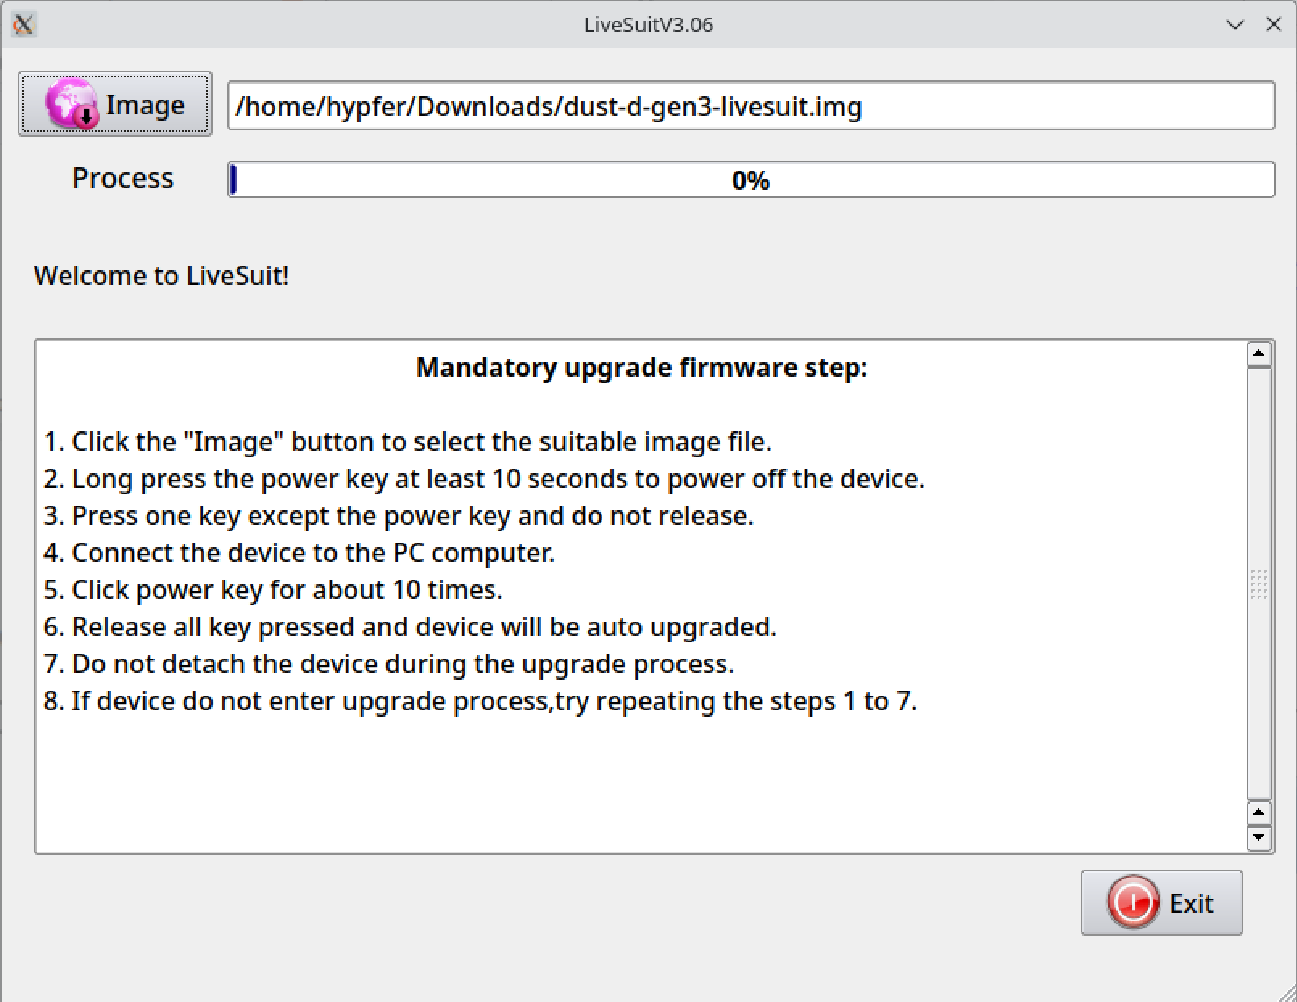
After that, you can start the application via ./LiveSuit.sh . You might need root permissions…
Retrieve Config Values
To create a custom firmware, we need to retrieve some config. We’ll use the tool we just build and run an image, which will offer us a fastboot interface.
Image version in September 2023: https://builder.dontvacuum.me/nextgen/dust-d-gen3-livesuit.img
For the latest version check https://valetudo.cloud/pages/installation/dreame.html#fastboot
Connect the Robot
Here’s the Pinout from the slides from Defcon
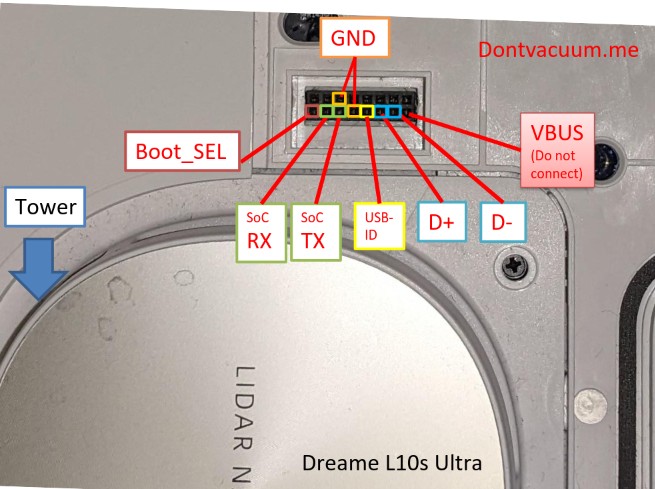
According to some guys from Telegram, we want D+ and D- as well as GND connected to USB (the PCB is not doing anything else, check out the files).
Also the Boot_SEL needs to be connected to GND.
YOU DO NOT WANT TO CONNECT THE +5V FROM YOUR USB TO !!!ANY!!! OF THE PINS
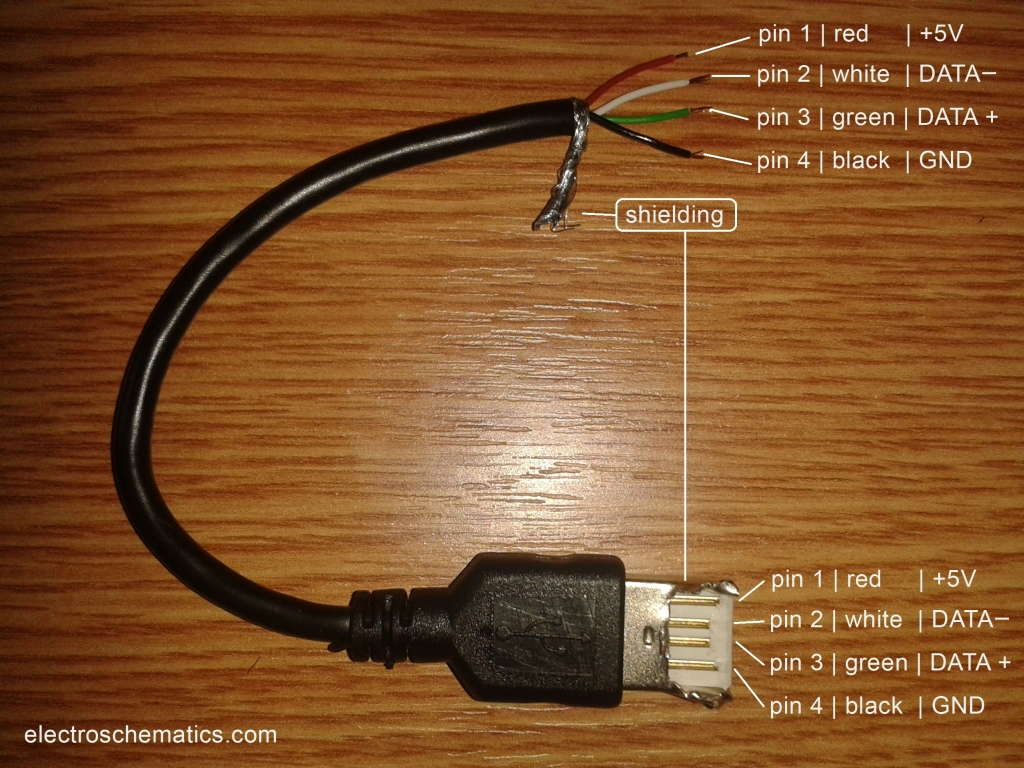
| Pin | Name | Cable Color | Description |
|---|---|---|---|
| 1 | VCC | Red | +5 VDC |
| 2 | D- | White | Data - |
| 3 | D+ | Green | Data + |
| 4 | GND | Black | Ground |
Start fastboot for the firsttime
Start LiveSuit.
CAREFULL! THERE IS A WATCHDOG (160 SECONDS) RESTARTING YOUR DEVICE AND SOFTBRICKING IT! PREPARE A TIMER FOR 160 SECONDS OR LESS
Start the Timer!
Follow https://valetudo.cloud/pages/installation/dreame.html#get-the-config-value
1) Press and hold the button on the PCB.
2) Then, press and hold the power button of the robot. Keep pressing the button on the PCB.
3) After 5s, release the power button of the robot.
4) Continue holding the button on the PCB for 3 additional seconds.

The button LEDs of the robot should now be pulsing. With that, plug the USB cable into your computer.
In my case: 7bb1387a791cc51a7c28de3e5951ed00 my SN : R222802BBEU0071601
Create the Custom Firmware
Open https://builder.dontvacuum.me/_dreame_r2228.html and fill in all infos.
Maybe you need to add your Check Value here: https://builder.dontvacuum.me/checkvalue.php
Root
CAREFULL! THERE IS A WATCHDOG (160 SECONDS) RESTARTING YOUR DEVICE AND SOFTBRICKING IT! PREPARE A TIMER FOR 160 SECONDS OR LESS
Follow https://valetudo.cloud/pages/installation/dreame.html#prepare-for-rooting
Backup
In addition to the backups mentioned I also followed https://builder.dontvacuum.me/dreame/faq.txt
dd if=/dev/mapper/private | gzip -9 > /tmp/backup_private.dd.gz
dd if=/dev/by-name/misc | gzip -9 > /tmp/backup_misc.dd.gz
dd if=/dev/by-name/UDISK | gzip -9 > /tmp/backup_data.dd.gz
tar cvf /tmp/backup.tar /mnt/private/ /mnt/misc/
Valetudo!
Follow the main Documentation from https://valetudo.cloud/pages/installation/dreame.html#install-valetudo
Recap / Summary
While I had a hard time to understand the starting point, with all the material from DEFCON, the FAQ Page etc etc, basically the only steps to look deeper into:
- how to connect the Robot: USB not UART, no Breakout-Board necessary.
- Install the linux tools on Fedora
- Create dumps of the storage of the robot instead of “only” a file backup.